Friday, 23 May 2014

Sequential Order of House Painting Process

When you have planned to get your home painted, trust no other than professional painters in Auckland. The painters have wide ranging experience in all kinds of house painting. They begin a project in consultation with you and all through the process keep in constant touch with you. This ensures there is no flaw in painting, and the house is painted and treated like the prized possession that it is.

A personal and proactive approach by the painting franchise gives customers a peace of mind that their home is in safe hands and their work will be done correctly, on schedule and to satisfaction.

Here are some significant steps that professionals take to ensure your house is painted to perfection. 

Producing high quality paint jobs comprises of 4 steps

1.    Surface preparation
Surface preparation in context to painting refers to the process of making the walls, roof etc., fit for painting. Surface preparation indoors would confirm the walls are made smooth by applying Plaster of Paris. House painting services in Auckland prepare the surface for painting so that the new coat of paint lasts longer. 

Surface preparation is important; since there are many methods for preparing the surface, you and the franchisee need to decide on the kind of preparation is to be done so that you get the desired results. On the exterior of the house, preparation work would include tasks like filling cracks and water proofing etc.

After this, painters will resort to priming. Priming is carried out to seal any staining or porous surface. In most cases this is done on wooden surfaces after sanding, scraping and paint removal has been done. Professional painters use high quality primers to best adhere to the surface so paint job lasts for a long time.

House washing is the next most vital step in preparing the surface for painting. It is important to ensure a clean surface for new paint to last longer. House washing ensures all the mildew, dirt and other contaminants are properly pressure washed with cleaning solution. Power washing cleans all loose dirt, grease and moss to provide a clean surface for the finish coat to grab. Pressure washing also brightens up the driveways and sidewalks.
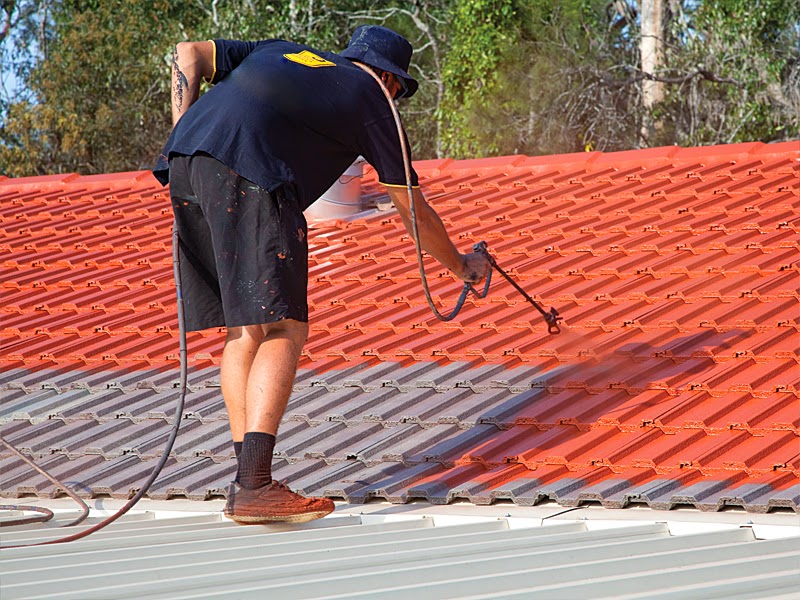
2.    Painting
Painting is the step to be followed in getting the final coat of paint on the surface. Once the surface has been mended, washed and completely prepared for painting, house painters will apply the final coat of paint. The process of house painting and roof painting is different for all different kinds of surfaces, and professional painters know how to paint a particular type of surface to get the desired effect. The finish coat of paint provides the desired colour and gloss level and provides protection against UV rays and weather.

3.    Clean-up
The best thing about hiring a franchise for your house painting job is that they’ll give you a spick-and-span home. Painters make sure they clean up the area they have painted on a daily basis. And on completion of the work, they will remove all paint chips and stains and store the materials back neatly.

4.    Inspection
On completion of the work, the contractor will invite you for an inspection of the work. You are asked to complete a feedback card for your house painting job.


Tuesday, 13 May 2014

Professional roof painters transform old house into a beautiful new home

Roof painting can be really tiring and technical task. You need to be professionally trained and must have ample time on you to be able to paint the roof of your home yourself. For other times, Roof painters in Auckland can be a great help.

Painting the roof becomes technical because painting the roof varies depending on material the roof is made of. Unless you have the knowledge of what kind of paint is ideal for what material, you cannot get down to the task by yourself. You must seek expert advice on choice of paint and color and must employ a contractor to do the task of painting the roof for you at minimum cost.  

Painter prepare by cleaning
Proper preparation before roof painting is very important. Preparations should begin with cleaning the roof. Cleaning the roof of all the leaves, debris and mold, and getting rid of any flaking paint from the roof is must. Scrubbing the roof well with detergent solution or pressure clean the roof to get rid of the dirt is task of a specialist. You can injury yourself trying to use a pressure washer to clean the roof. Roof cleaning job is thus best left for the experts.

How roof painters make the technical job look easy
  • Before painting the roof, painters ensure they have cleaned the roof thoroughly. They ensure there is no dirt on the roof, since dirt prevents new paint to form a lasting layer. The painters clean and rinse the roof thoroughly before painting it. They have profession gas washers and chemicals, which they use with proper safety and precaution to ensure spotless cleaning
  • The paint that is chosen should be light, heat resistant and should not crack or peel and must work with the material on your roof. Roof painters are professionals, they are well versed with what paint is to be used on what kind of roof material and in what ratio. This allows them to paint the roof more economically and quickly
  • If the roof is made of metal or steel, roof painters apply a coat of anti-rust paint to protect the roof from rust
  • If you want multiple coats of paint, roof painters allow the first coat of paint to dry properly before applying the next coat.  
  • Painters ensure they have checked up with the meteorological department, or have checked up the weather on the internet to see that rain or harsh weather will not come to ruin your newly painted roof. A newly painted roof will need a few days of sunshine to dry up completely
Roof painting transforms an old and tired home into a beautiful new home. Choosing natural colors like terracotta, turquoise, brown and black is ideal choice amid homeowner, since these colors tend to match with the rest of the house.

Roof painting professionals in Auckland are aware of the weather conditions in the city. They are familiar with the type of materials used in making roofs in the city. Therefore, these professionals are the best to carry out the roof painting job for you in least possible time and money.


Tuesday, 6 May 2014

How to Paint Corrugated Iron and Tiled Roofs

A corrugated metal roof is best suited for areas that have extremes of weather and excellent for outhouses and sheds. It is easy to maintain and a layer of paint can increase its life considerably. Roof painters in Auckland are painting roof by the modern airless method successfully. If the right paint is chosen and applied correctly it can leave the homeowner stress free for almost ten years. Follow the steps carefully to get the desired results.

1. Cleaning the Roof
Depending on the budget of the homeowner the roof can either be cleaned by Roof painters in Auckland or by the owner himself. A high pressure water blaster is the easiest methods to clean a roof. It works well on all surfaces and does the job more quickly than a broom. The high pressurized water is able to reach all corners and nooks. For smooth surfaces a broom is advisable which could be combined with a detergent and a garden hose in the second stage. A high pressure water blaster is not required for smooth surfaces.

2. Painting a Corrugated Iron Roof

After the roof is cleaned, it should be checked for wear and tear. If it is more than a year old there are chances that it might have lost the oil from the fabrication. Before actually painting the roof it is advisable to first treat it to a coat of good quality primer. Priming will also solve the problem of corrugated patches of iron and will ensure that the paint bonds strongly to the surface of the roof. Before selecting the colour for the roof it should be kept in mind that light shades of colour will be good reflectors of heat and dark colours will be good at absorbing heat. Spraying airlessly is the fastest method to paint roof.

  • Start spraying in sections with a width of a meter.
  • The spray should then be moved downwards in the direction of the iron flutes.
  • The joins in the iron can be can be used as guiding line.
  • Once a section is completed till the bottom the painter needs to back up to the start and come down again
  • A wet edge needs to be kept to ensure that painting is completed before the painted section starts to dry.
  • There are rollers available in the market that look like corrugate iron for the corners and ridge caps.
  • The join in the sheets can be painted with a brush as they are raised sometimes.

3. Painting a tiled roof
A tiled roof needs painting when the glaze has worn off and the roof starts to look shabby. Some roofs look as good as new once cleaned with a pressure washer others need a coat of paint.

  • The main component to take care of is the ridge capping.
  • They need to be fixed before the painting is done.
  • This process is called bedding or pointing of ridge caps.
  • Apply a layer or sealer or primer before painting the tiles.
  • Now apply two coats of paint and let them dry naturally.
  • Painting can be done with a brush or by the airless method


Thursday, 1 May 2014

Painting the kitchen- Selecting the colours

When selecting colour for the kitchen, keep in mind the cabinets, doors and windows. Be creative and take bold chances with saturated and deep colours. There are many Apps available today that enable a user to upload his favorite image and a colour palette is designed for him. These apps also provide information about the nearest stores and make ordering and sampling as easy as buying a pair of shoes online.
A kitchen should be an expression of the personality of the homeowner. Ideally choose colours that your love for it is the family that would be spending quite a lot of time there. Have a look at some ideas that can be kept in mind when choosing a colour scheme for the kitchen.
1. Greens and Oranges
A combination of green and orange is sure to bring energy to any boring kitchen. Even the most experienced painters in Auckland would agree with that. Tangerine and sunshine yellows go very well with kitchens that have wood work in dark mahogany colour. They also work well in kitchens that have a backdrop in neutral shades. Studies have proven that orange is a mood booster; it adds a tincture of positive energy to the spaces where it is used. Starting your day in a bright yellow kitchen is sure to give a jumpstart to your day.
2. Yellows and Reds
This combination has been a hot favorite in Europe for decades. A deep red painted wall with cabinetry in golden yellow is sure to transform any kitchen into an English manor or a villa in Tuscany. For small kitchens, yellow should be used as the base colour to make it appear bigger. Add red shades to highlight the design. Both these colours can also be used creatively for fringes and frames.

3. Browns and Blues
Blues and browns is a very popular combo. It carries great esthetic appeal and is soothing to the eyes. A modern or conventional home kitchen looks very stylish when painted with chocolate brown with pops of bright sky-blue here and there. The cabinets can also be painted brown and the walls any shade of blue. Blues and browns can also be combined very effectively with creams and whites to make the kitchen warm and cozy. If the kitchen needs a complete makeover at the time of house painting, select deep shades of both the hues and combine gold accents and white with the dark tones. Try any rhapsody in blue and it is sure to be a hit. Expert painters in Auckland know that.
4. Grays in any shade
Designers across the globe are opting for grays over stark white for a contemporary kitchen. House painters in Auckland too have been opting for gray shades lately. If the cabinetry is in black, brown or white, using a gray in the background helps create a sense of calm. Grays can also be easily combined with soft shades of green and cool blues to make the kitchen look warm and relaxing. Since grays are neutral, you can experiment with any bright colour on the wheel, from reds to pinks to yellow. A homeowner can also select varying shades of gray and give the kitchen a very chic look.

Thursday, 24 April 2014

Simple Tips To Paint Your House Like Professionals

A clean and fresh paint job has the power to totally transform the look of your home. Auckland painters ensure that your New Zealand home will look like new and is totally weatherproof, in minimum time and at least possible cost to you.

The paint, besides making your home look refined also protects your investment. It shields the house from sun, rain and wind and after 10-15 years the paint can begin to crack and peel and you need to paint it over again.  
When you have to paint the house, it is best to call in a contractor and get the job done professionally. Painting can transform the entire house from mundane to inspiring. It is therefore important to ensure that serious planning goes into deciding colours and shades to be used.

Painting interiors
When you are decorating interiors of your home, color plays a very important role. Paint gives life to bland walls. The right colour choice and correct painting techniques add texture and dimension to walls so that they stand out. There are many colours that you can chose from, choice of colour depends on the amount of natural light, windows and gloss level in the space.

Painting exteriors
Cleaning and sanding the surface properly before painting is crucial, if applied over moss or mould, dirt or damp the paint won’t last. These are things that determine how long your painted exterior walls can last. Thorough scrubbing is a must prior to painting the exterior surface. Scrubbing removes dirt and residues of broken down paint, which may otherwise keep the fresh coat of paint from adhering to the walls.

Whether it’s the interior or exterior, painting preparation needs to be spot on, so here are a few tips you can keep in mind to paint like a pro.

Clean walls to make the paint last longer
It is really important to prepare properly before a paint job. Painting exterior walls is a pretty straight forward exercise, but most often overlook the importance of cleaning the house before painting. Scrub the walls thoroughly, make sure they are clean and sand to take any remaining dirt and gloss off, if this done the paint will adhere to the walls for a longer time. 

Primer is a must before paint
No matter how tempted you are to paint topcoats directly you must know that using a primer is essential, and it must be applied to the walls before painting the topcoats or finish coats. Primer is important because it provides a key for the topcoats and can also enhance the true color of the topcoat.

Know how much paint to use
Being economical does not mean choosing inexpensive paint; it means to utilize the quantity of paint so that you’re not wasting any unused paint. Here is a tried and true formula for working out paint quantities for your job. Professionals recommended paint coverage is around 12 square meters per liter. You must remember that rough, unclean or untrimmed surfaces may require more paint.

Use a roller
Painting the walls can be time consuming. To be more professional and to cover your painting task much faster, use a paint roller instead of a paint brush. You will not only finish with a better texture but also in half the time.  

Monday, 21 April 2014

How to Restore Real Hardwood Furniture

Whether it’s a cherished family heirloom or a great garage sale find, real hardwood furniture can take a beating over time. While hardwood is amazingly durable, it’s also paradoxically vulnerable to age and abuse. Crackled finishes, water stains, and other imperfections can occur due to daily use or misuse. Here are some tips for bringing back its luster and life.

Assessing the Situation
Are you sure your hardwood furniture really needs restoration? Sometimes years of gunk and grime buildup can make a piece of furniture look a lot worse off than it really is. Give it a good cleaning first so that you can get an accurate picture of the damage.
Before you can clean it, however, you need to know what type of finish it is. The furniture’s finish will determine the type of cleaning method you need to use. You should be especially careful of finishes that you suspect may be antique, as disturbing the natural age on these types of pieces can destroy their value.

Restoring a Finish
If you’ve determined the furniture’s finish and given it a good cleaning accordingly, and find that it does indeed need further attention, it could be that the finish needs touching up or total reapplication. If it’s not an antique or you’re not concerned about value, or if you don’t want to match the finish, you can simply remove the existing finish by sanding and then refinish as you like.

If you do want to match or blend the existing hardwood furniture finish, however, you’ll have a bit of extra work to do. If the problem is cracking in the finish, you can usually re-amalgamate it using either denatured alcohol, lacquer thinner or a combination of the two. Furniture finished with varnish will most likely need to be completely stripped and refinished. Note that re-amalgamation only works for restoring the finish itself; scratches that run into the wood require more intense methods.

Removing Water Stains
Moisture can lead to a white or milky “stain” on hardwood furniture. This can be an isolated occurrence, such as a beverage being set down without a coaster, or it can occur throughout the piece after being in a high-humidity environment. You can usually remove surface water stains by rubbing the affected areas thoroughly with an oil polish.

If that doesn’t work, try using a mild abrasive paste such as toothpaste, baking soda or a bit of No. 0000 steel wool to gently rub the area. Clean the area completely, use dab of mild solvent to smooth the finish, and then apply a good coat of wax or other finishing polish that’s appropriate to the type of finish you have.


A good piece of hardwood furniture can be an excellent asset in any home, from functional, design and value perspectives alike. Before trying any restoration techniques on your furniture, be sure that you know what you’re dealing with and that you’re not destroying any value of the piece by tampering with it. When you’re confident in your understanding, go ahead and make the piece your own — custom restored to your unique tastes.